
…And that, my friends, is why I missed posting a couple of weeks ago. And, incidentally, why this post is happening today instead of yesterday; but more on that specific tardiness later.
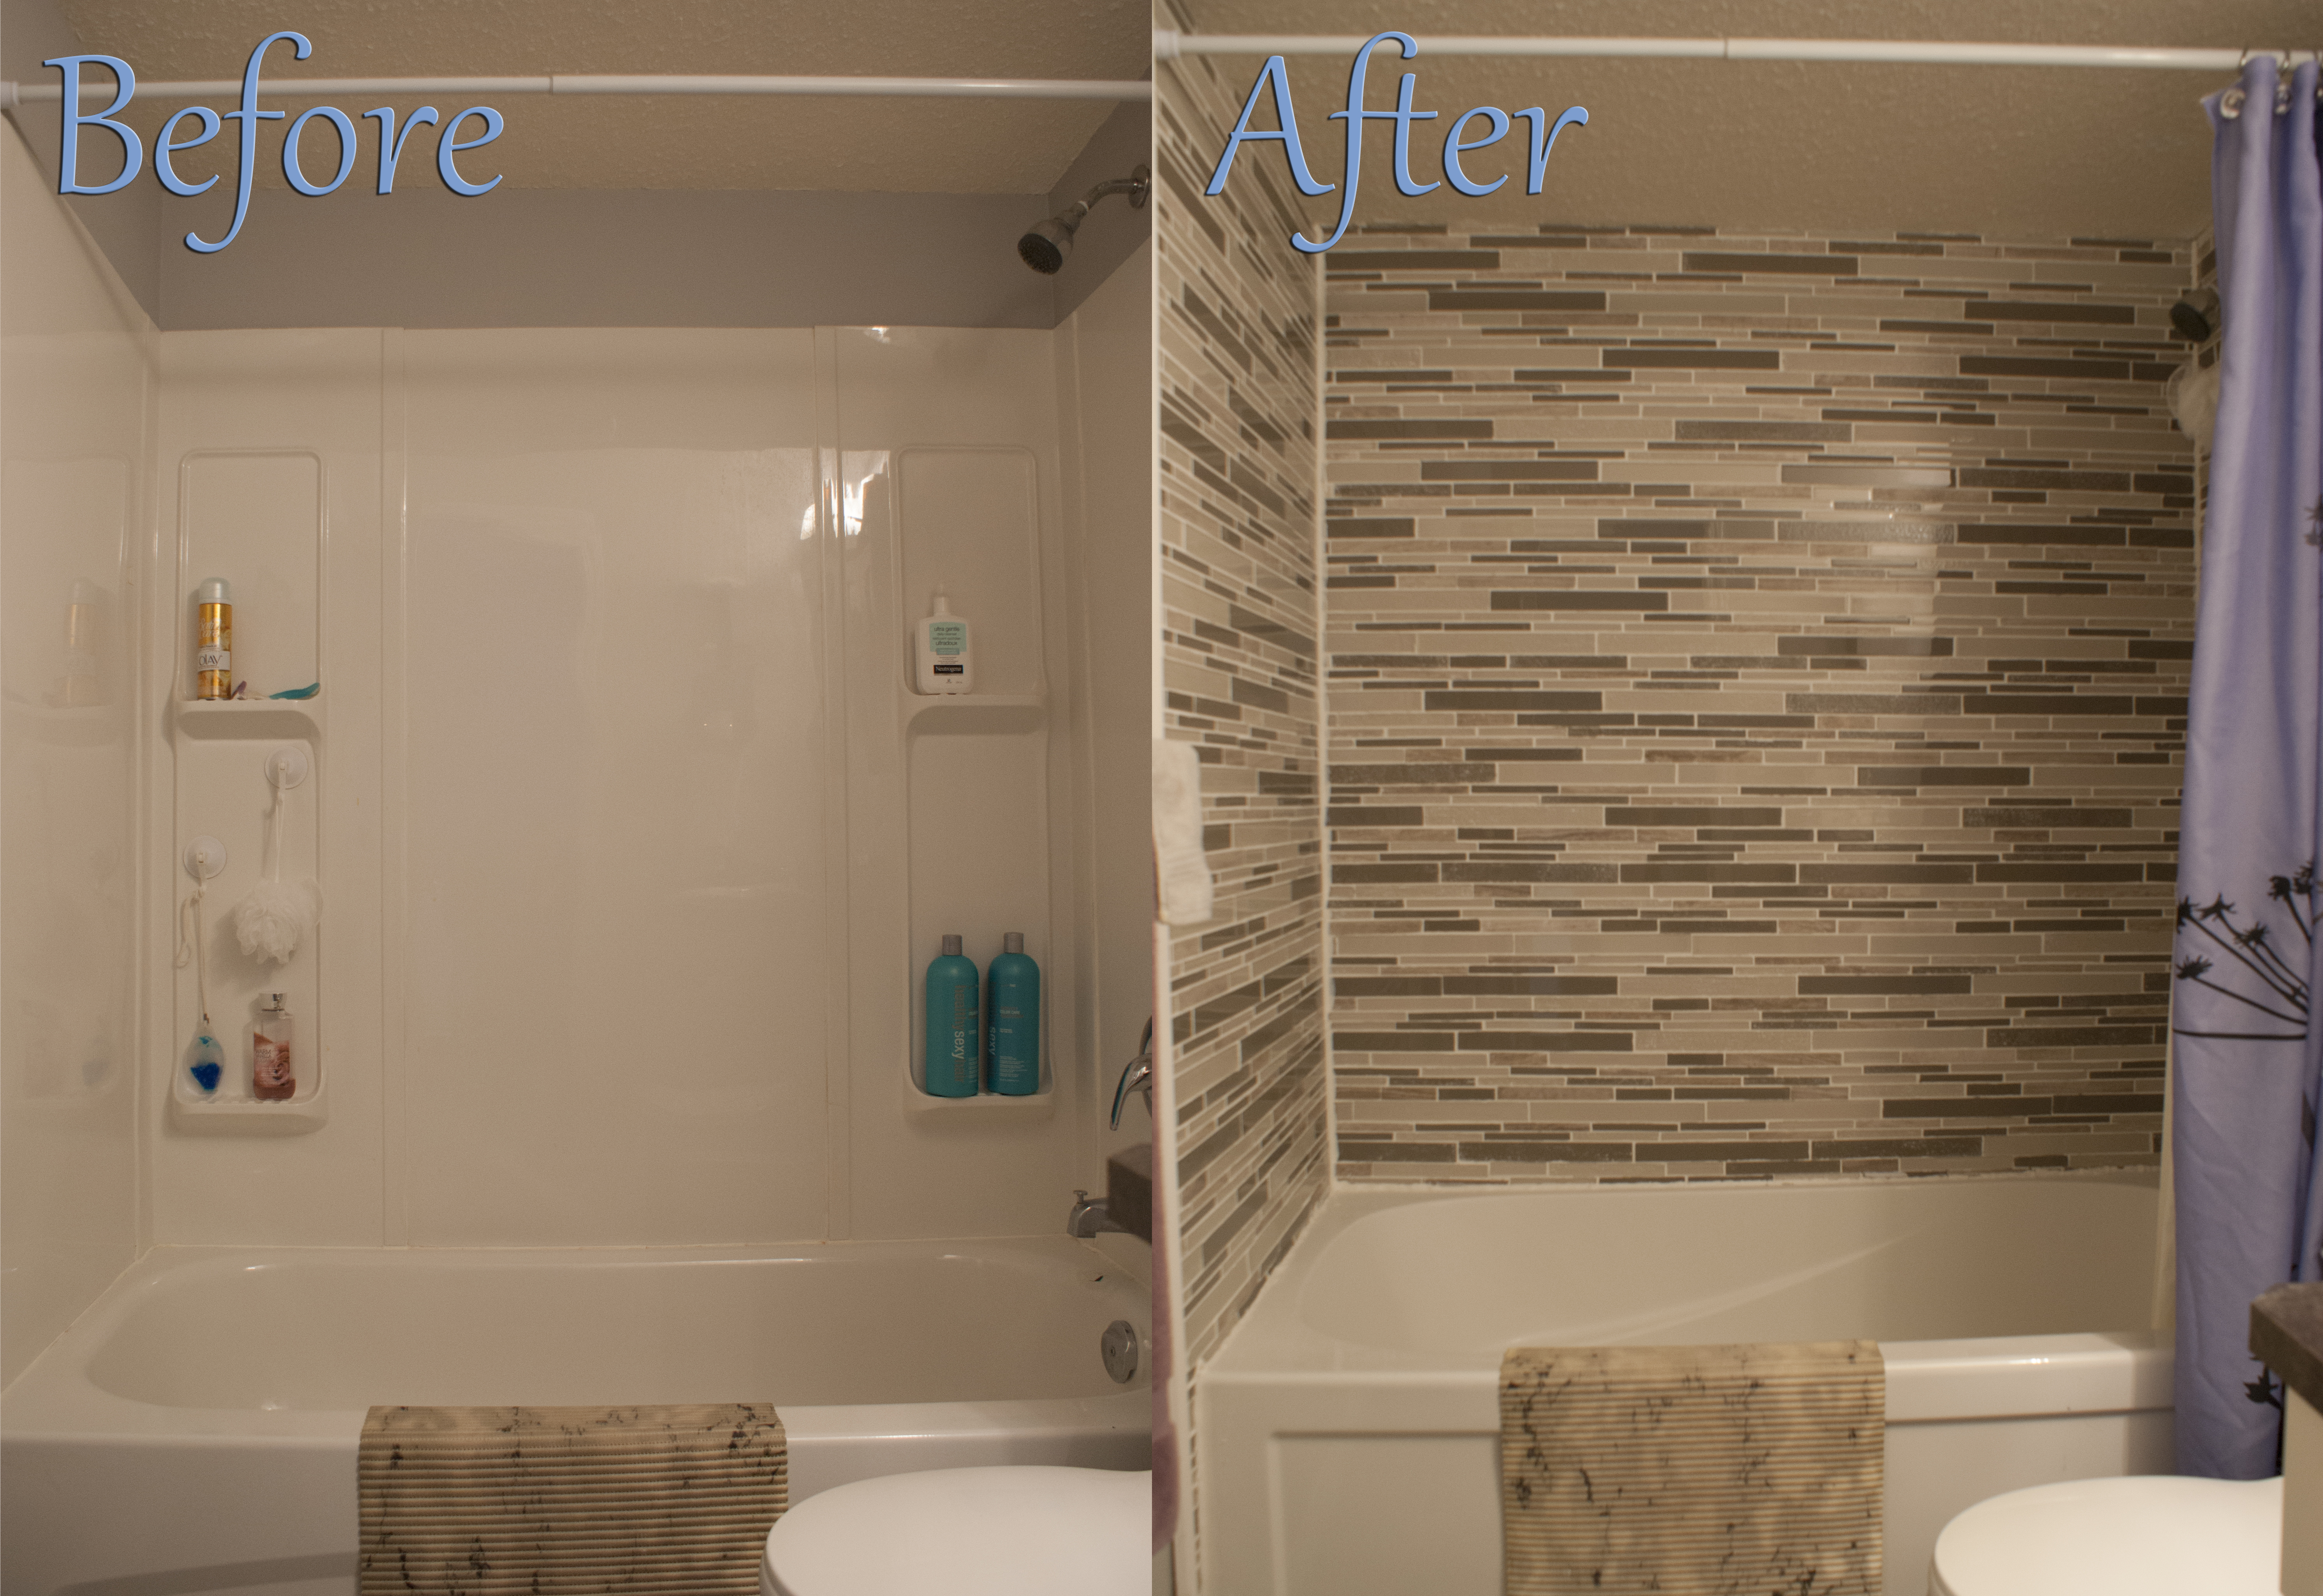
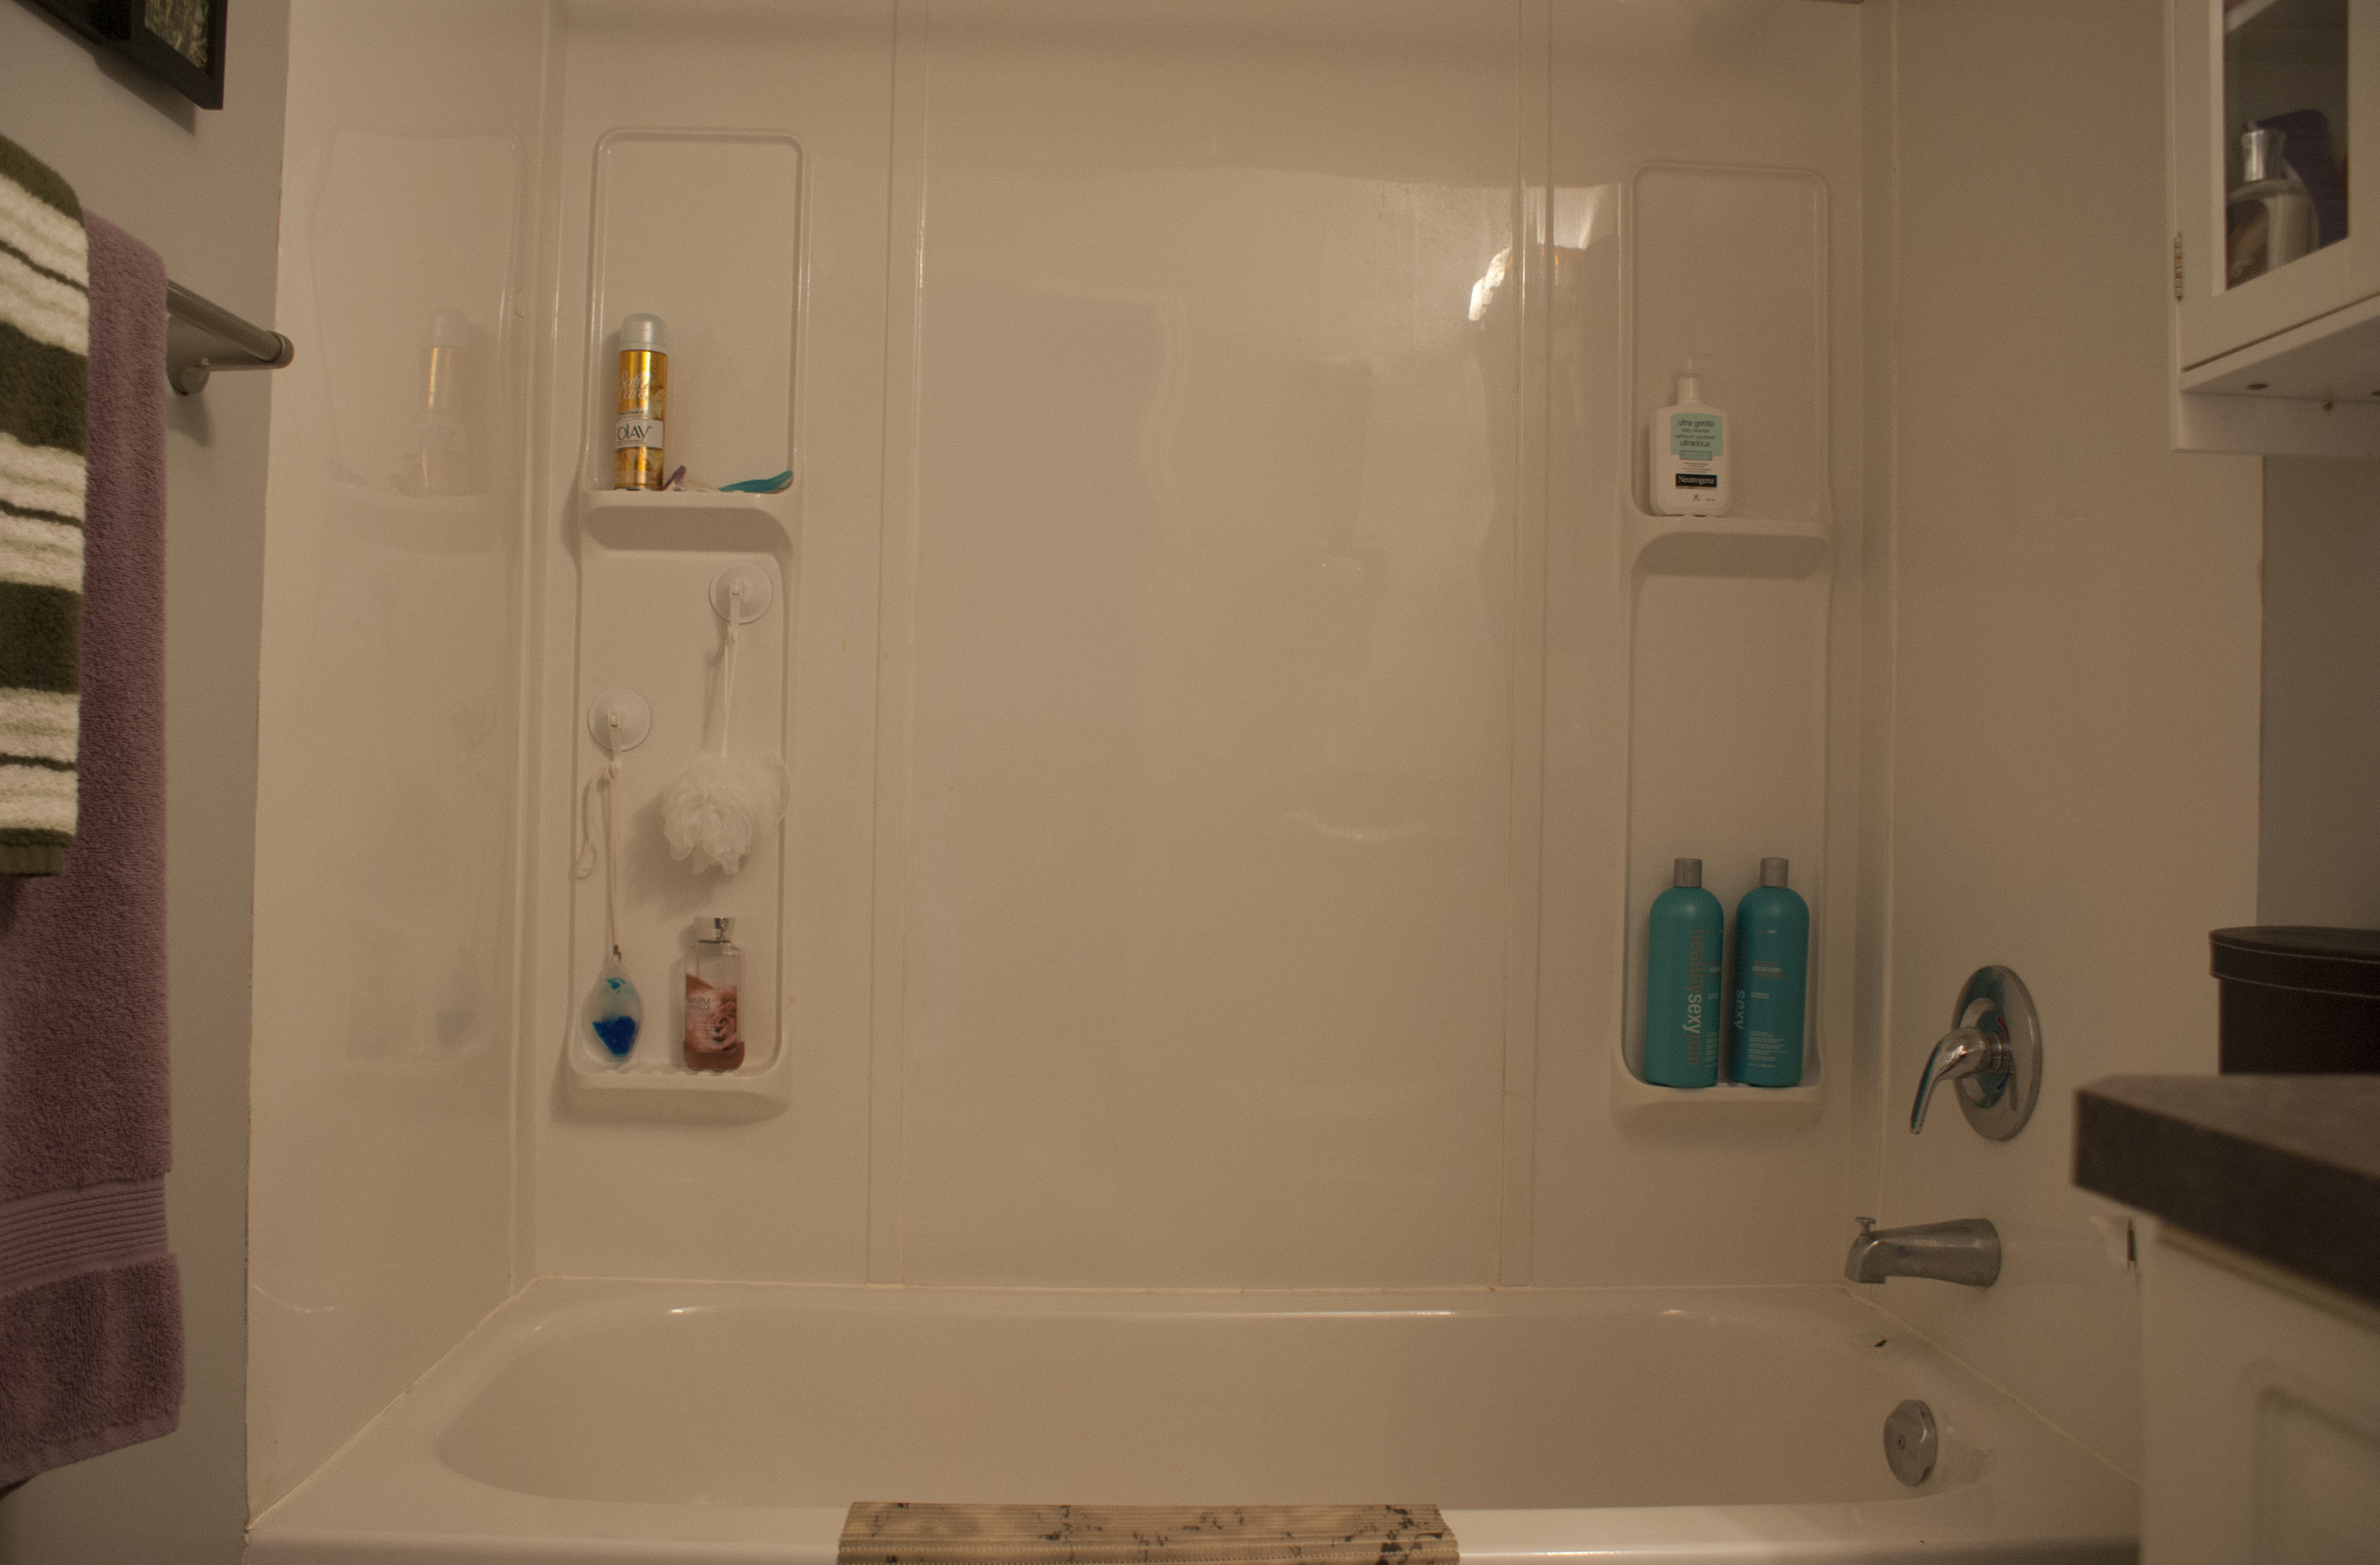
As you can see, I took some time to redo my bathroom. Well, part of it, anyway. I was tired of my old, shallow bathtub and plain, not-properly sealed surround. To be honest, I was tired of it as soon as I moved in back in May. But I needed to take some time to save up money and figure out exactly what I wanted to do before I started tearing things apart.
Eventually, I got to the point when I had the materials I wanted and needed (I thought) and knew what steps would need to be taken. I enlisted the help of family and friends for the things I couldn’t do alone, and, on the weekend of February 21, began the process of renovating my tub and shower area.
As I’m not a professional by any means—and as I’ve never renovated a bathroom before—there were definitely some bumps, setbacks and stupid mistakes during this process. And today, I want to share with you some of the things I learned.
Be warned, this gets a bit long. But, hey, you’ll probably get a laugh out of my naivety.
- Make sure you know what you need—and make sure that you have it before you start.
Okay, I admit, this shouldn’t have been a “lesson learned.” But you see, before starting, I honestly thought that I did know what I needed and that I had it all. And then, after talking to the plumber-friend who helped switch out/move the drains, I found out that some of what I bought was actually much more difficult to use than other products on the market. So, exchanges were made and my life became easier.
Then there were the little things that I hadn’t thought of beforehand. Things like trim to go along the edges of the tile (because I couldn’t manage to line the tile up perfectly), extra thinset, and proper materials to help me clean dried grout off my tiles.
And speaking of grout…
- Always wear gloves when working with grout. Always.
Now, if you’re anything like me, you’re going to see the “Make sure to wear gloves” label on your grout and think that it’s there because grout is a pain to try to get off your nails and hands. Then you’re going to see the “May irritate skin” label and think, “Oh, okay, so it could end up making my skin itchy or a bit inflamed.”
I started out with good intentions. I wore gloves when I mixed the grout, then took them off during the ten minutes that it needed to sit before I could use it. But when I started grouting the tiles, the gloves completely slipped my mind. It wasn’t until I was about half done that I remembered them. And at that point, I kind of shrugged them off, figuring that I could withstand a bit of itchiness or redness.
What I hadn’t anticipated was the grout burning a small hole in the skin on one finger, and leaving four of my fingertips tender for nearly a week.
I’m fine now; the tenderness has eased off in all but one fingertip, and the tiny hole (it was no more than about three millimeters wide) has healed over. But, it turns out I got lucky. From what I read afterward, grout and other cement-based materials can cause caustic burns, blisters and heavy scarring, among other things.
- Make sure to set aside more time than you expect you’ll need.
Can you believe that I anticipated this project would take me less than a week? Yeah, that was a serious underestimate on my part.
To be honest, though, it probably would have taken most people much less time that it took me. I turned out to be a slow tiler, I did the tiling and most of the grout work alone, and I only had evenings and weekends to work on it. Someone who is more skilled, has help or is able to dedicate a few full days to the project likely wouldn’t need as much time as I did.
- Clean that grout off as soon as possible.
This one was the hardest lesson for me to learn. Seriously, I would have preferred more cement burns.
I did the grouting one evening after work, thinking it would only take me maybe two hours (have you spotted my pattern yet?), and then I could wipe the grout off with a damp sponge easily, just as the label suggested.
Well. The grouting ended up taking me three and a half hours—time that I didn’t even realize was passing. I actually kind of enjoyed the grouting itself. But when I went back to clean the grout off, it had hardened. My damp sponge wasn’t really making a difference, and removal was going to take some serious effort.
I had to make a decision. In my already tired state, I could stay up late and scrub and scrape that grout into submission. Or I could wait until the next evening to tackle it, when I would be better rested and ready to battle it out.
I decided on the latter option. The next evening, I gathered my tools and got started. After about two hours, I was only about two-thirds of the way down the left-side wall. My arms hurt, and both the plastic putty knife and sanding sponge I was using were pretty worn down. I gave up. And by the time I went to bed, my right arm was sore, tingling and numb all at once.
It was obvious that my method wasn’t going to work very well. On my way home from work the next day, I stopped by a hardware store and picked up a fibre brush attachment for a drill—a tip I had spotted online.
Do you know what that brush attachment did to the grout on my tile? Nothing. But it did take out some of the grout in between the tiles.
That may be when I reached my breaking point. There may have been some swearing, and possibly some crying. And I may have turned to Cookie for some cuddle-comfort, but she may have just looked at me, turned her back and hopped away because she only allows physical interaction on her terms and me being upset is not one of those terms.
Those are all just possibilities, of course. I’m not necessarily saying that any of it happened.
Anyway, I’m lucky enough to have a pair of amazing parents who quickly agreed to come over on Saturday and help me finish cleaning off the grout. We scrubbed and scraped, and eventually those tiles were shining again.
Those extra few days of cleaning were what pushed back the date of this post. I spent Sunday doing some finishing touches—things like the sealing, trim and putting the rest of my bathroom back together. And when all was said and done, there was one more lesson left for me to learn.
- All of the work, pain, and frustration were totally worth it.
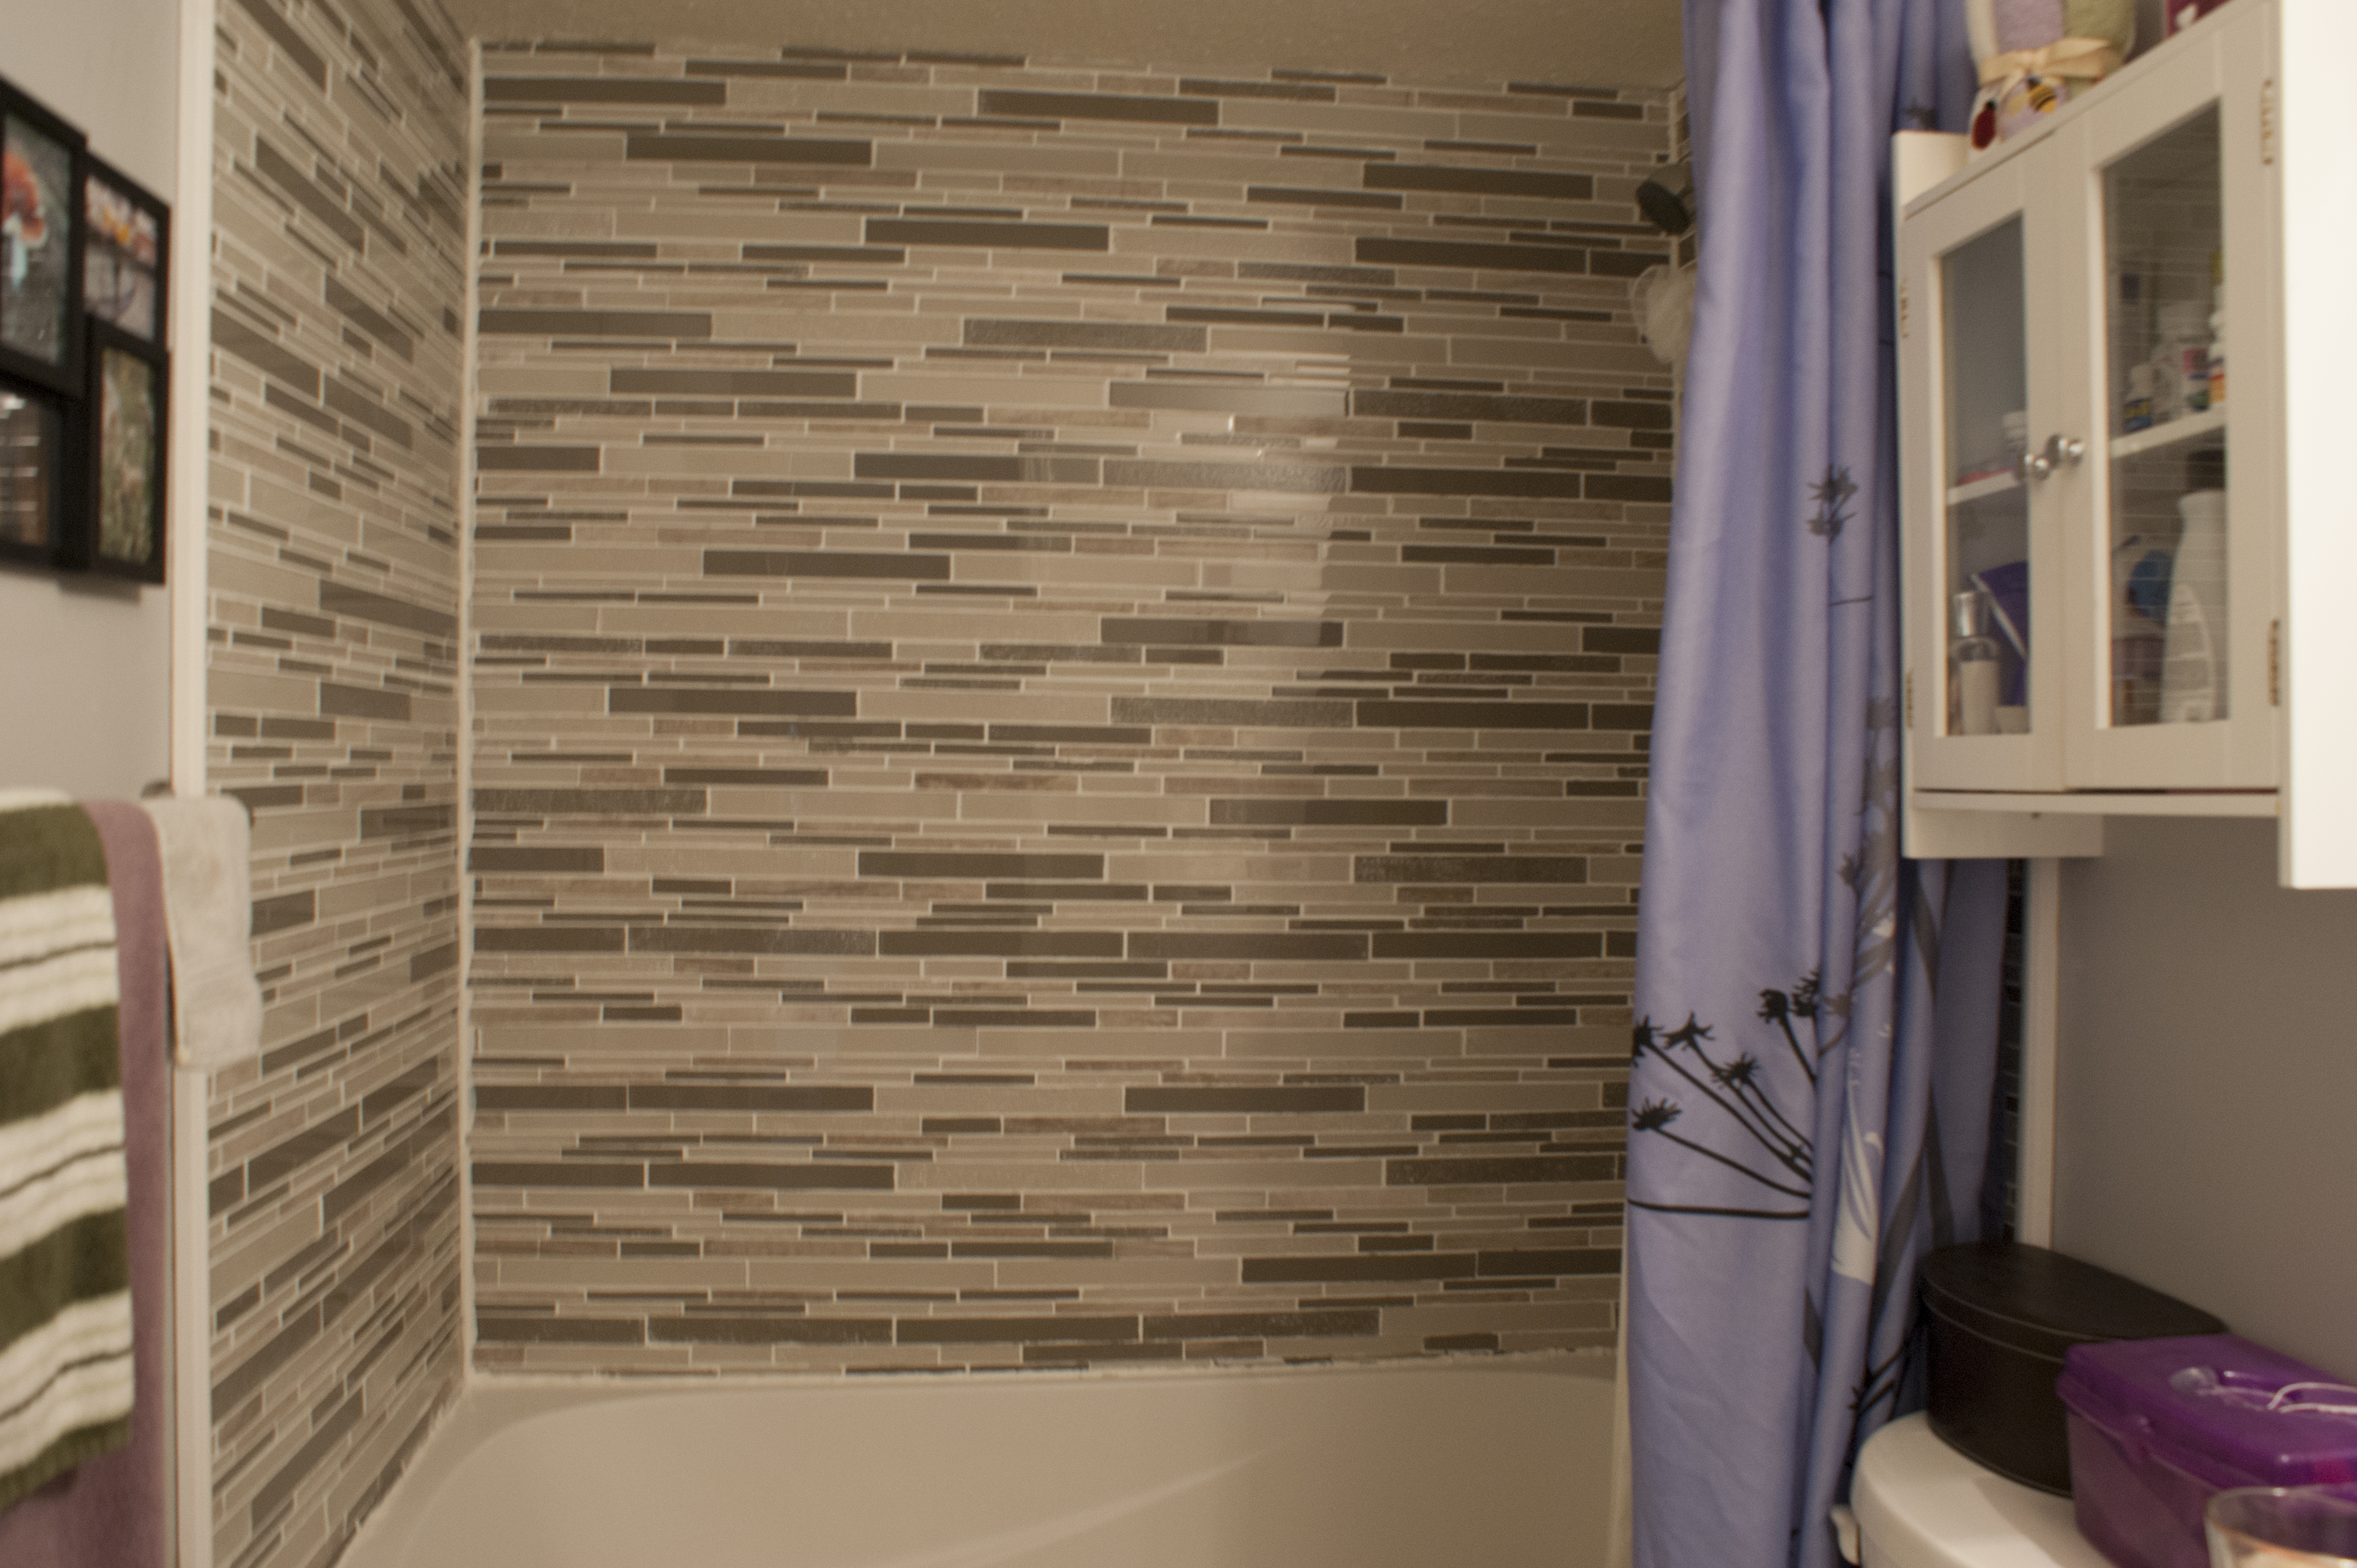
I love the results. And I’m super proud of the job that I did. I may have made some mistakes, and I may have needed more help and time than I anticipated, but the point is that I did it. I took on a project that a lot of people (including, at times, myself) didn’t think I would be able to do and I did a pretty good job of it.
And you know what? That particular lesson is one that carries over well into any part of life. Whether it’s writing, renovating, or any other type of activity you can come up with, those projects you love to do or love the result of will be worth any amount of blood, sweat and tears you put into them.
Even if they mean dealing with stupid mistakes and beloved-pet rejection along the way.

Leave a comment